Whether you want to reset your SSD to work like when you first bought it, or just intend on giving it away, you’ll want to format your SSD drive. In this article, we will discuss how to format SSD in a few simple steps.
Formatting an SSD drive can be super daunting if you’re doing this the first time. Especially since SSD cards differ drastically from your usual HDD.
Without proper knowledge of what to do, you can even shorten the life-span of your SSD card!
Fear not, however, with this quick and simple guide, we’ll make sure you know everything you need to know before you start formatting.
Getting Started :
There are a few things you’ll want to know before you actually start to learn how to format your SSD drive. If follow these instructions to the letter, we’re sure you’ll face no problems whatsoever.
Erase/Backup personal data:
Now the first thing you need to do before you learn how to format your SSD using windows 10, make sure you’ve handled your data properly.
If you intend on reusing your SSD personally, then you’ll want to make sure you’ve backed up your data. There are other methods to recover your data if it’s already formatted. However, those are much more technical and lengthy processes and are best avoided.
Which brings us to our next step. Since these recovery methods exist, you’ll want to complete a deep clean. This is especially true if you intend to give your drive to someone else. Completing this step helps you protect your privacy from the nefarious side of the world.
To deep clean your SSD, simply go to the website of its manufacturer. More often than not, there will be a method or application provided to help you completely remove all traces of your data.
Read More: How to add Sound Equalizer for Windows 10 in 2021
Select Quick Format:
Moreover, when you’ll be formatting on your desktop, make sure a quick format is enabled. If you haven’t ticked the quick format box, your PC will automatically carry out a full format.
Now, a full format is usually more efficient than quick formatting. However, with SSD cards, you’ll want to remember that they have different limitations than HDD drives.
This means, running a full length read/write process on the SSD could potentially reduce the life-span of your SSD.
Enable TRIM:
If your desktop has TRIM support available, enable it. You see, after reformatting drives, the SSD card is filled completely with ones and zeroes. Your reformatted SSD card may not recognize the data as irrelevant.
However, if trim support is enabled, that doesn’t remain as much of a problem. If your SSD card was formatted with TRIM available on Windows 10, it will automatically recognize the replaced data as unrelated and read those portions of the drive as free available drive space.
How to Format your SSD drive:
So let’s get started on how to format your SSD drives on Windows 10.
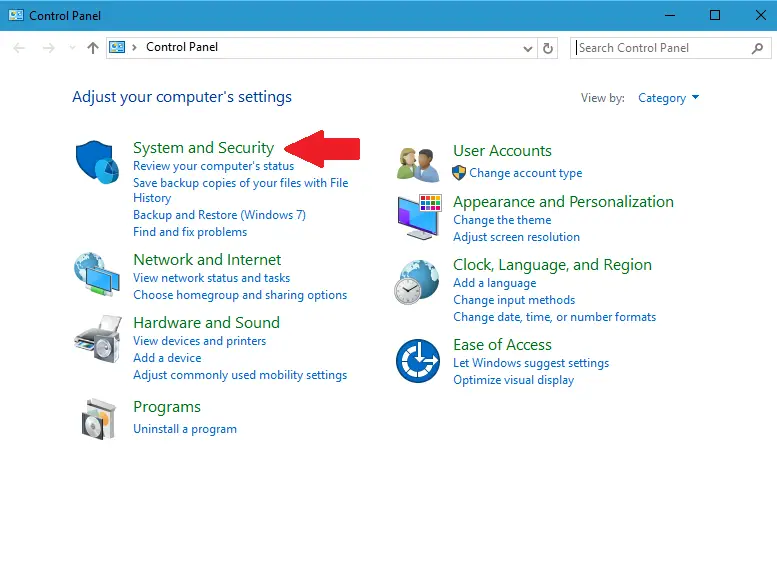
1. Start by finding the Control Panel of your desktop in the start menu.
2. Under the Control Panel go to System and Security.
3. Move to Administrative Tools, then Computer Management and Disk management
4. Find the disk you would like to format and right-click.
5. Click the Format option.

6. In the dialog that appears, select the File System (usually NTFS) and enter the Allocation Unit Size (usually 4096).
7. Check Perform a quick format.
8. Click OK.
Congratulations, you’ve just successfully formatted your SSD drive, and made it good as new.