If you’re here because you’re a music fanatic, a movie enthusiast, or maybe just want an all-around better sound experience, well, whatever the reason, you will want to set up a Windows 10 equalizer.
With an equalizer, you can have so much more influence over the audio you receive. Allowing you to take complete control over your soundboard, ensuring the best possible audio for every type of sound.
We all know how fickle sound settings can be, especially when it comes to media like music and video games. Basically any form of media that has layer upon layer of audio information.
If even one of those layers fails to keep up with the rest of the audio, the whole sound experience comes crashing down.
Which usually ends with you being unable to enjoy what you were viewing in the first place.
Fear not, however, with a Windows 10 equalizer installed, handling audio will be much smoother. You will have direct control over the audio you receive, and trust us, that can make all the difference.
No more dialogues being buried under the background soundtrack, or vice versa. With this simple guide, all your audio inconveniences will be dealt with instantly.
Table of Contents
How should I go about setting up a Windows 10 sound equalizer?
Setting up an equalizer for Windows 10 can make all the difference to the sound you receive. Sure, you can’t exactly make good audio if the quality is already bad to start with. With an equalizer, however, you can make sure all your audio “pops” in the right places, and is that much more satisfying.
Installing a windows equalizer can be as easy as 1,2,3. All you need to do is to follow a few key steps, like ensuring all your drivers are updated and choose the best equalizer for your needs. So how exactly do you download a Windows 10 equalizer?
First and foremost, you’ll need to make sure all your audio/speaker-related drivers are updated. After this, you’ll want to download from a few select soundboard software.
These include software such as Realtek, FXSound, and Equalizer APO. All that you’ll have to do next is link your soundboard, and you’re done.
Updating drivers:
This is probably the easiest step in the simple process of downloading and installing a Windows 10 equalizer. That being said, it is an extremely crucial one, and failing to complete this step will create a lot of problems later on.
To make things easier, we’ll be listing two alternative methods to ensure things go as smoothly as possible.
The manual method
Before you start this step, keep in mind that Windows 10 does automatically update drivers from time to time. However, if you want to be sure that you have all the latest drivers installed then follow these simple steps below:
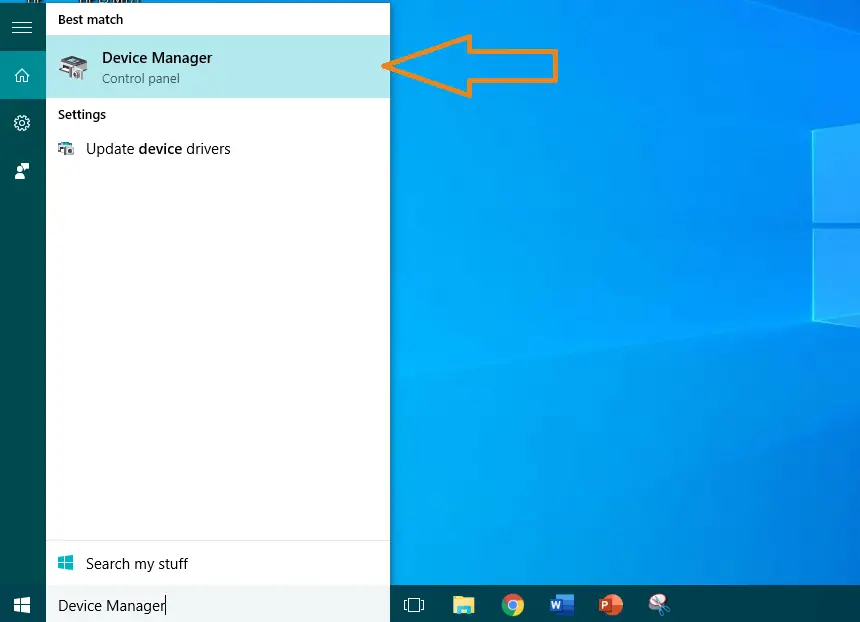
01. Start by searching for “Device Manager” in your start search bar
02. Once the Device Manager option appears, open it by clicking on it once
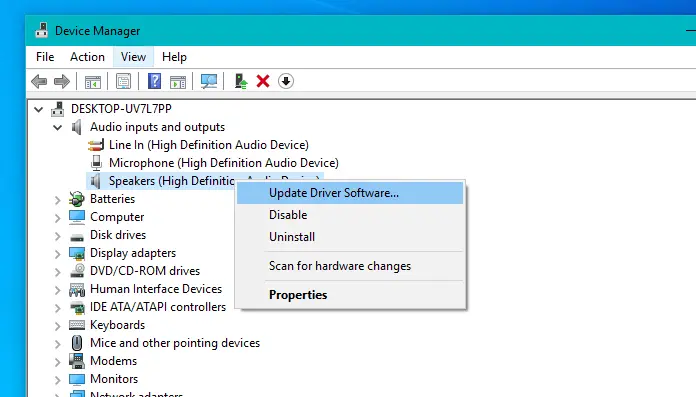
03. Locate the Audio inputs and outputs section of the device manager
04. Click it once and find the output device you want to use with the equalizer in Windows 10 (in our case we were using the built-in speakers of our device)
05.Continue by right-clicking said device and click the “Update Driver” option in the menu that appears
Windows will, however, sometimes fail to recognize that a new driver is available for the said device. In which case you may need to go to the company’s website directly, and manually download the driver from there.
Which brings us to our next method.
Using software that automatically updates your drivers:
If you want to avoid the hassle of manually updating your drivers, we recommend using this alternative method.
Sure, there are a few more steps involved, but once you’re done, you can have a device updater up and running in minutes. Allowing for usage long after you’re done installing an audio equalizer Windows 10.
We recommend the Avast driver updating software. It’s an extremely secure paid service. Avast’s app not only detects outdated drivers but sends you a comprehensible list as well. You can then choose which drivers you would like to update, and the service will do the rest.

If in any case, you would rather not use avast’s updating software, don’t fret, there are numerous others available. Such as DriverBooster, DriverTalent, etc.
Choosing and installing a device
The next step in installing an equalizer compatible with Windows 10. Simple enough, right?
Currently, there are a variety of soundboards that are not only compatible with Windows 10 but also have great performance and satisfaction reviews. Choosing a Windows 10 equalizer can be a little daunting, especially if you have no idea where to start.
Which is why, thankfully, we’ve shared our top 4 picks with you, and instructions on how to download and use every one of them.
The Realtek Audio HD Windows 10 equalizer
There’s a reason why some desktops come with Realtek equalizer for Windows 10 preinstalled. Realtek HD audio manager is one of the most robust and effective equalizers out there.
Sure, the interface on Realtek equalizer Windows 10 isn’t as enticing as some of the others on this list. But it’s attraction lies in its simplicity.
Realtek is known for being notoriously simple and basic. So much so in fact that most new users know how to run it almost intuitively. This is because the software doesn’t include any extra features that could scare users that are just beginning to use equalizers.
The app comes with a few included presets, that suits most users looking for equalizers on their Window 10.
So, if you’re a beginner to equalizers, and are a little daunted by using equalizers, then look no further. This is the equalizer for you.
How to install:
01. Start by downloading the Realtek audio manager here. If you already have one installed, skip to the next step
02. Make sure that Realtek audio manager is enabled. Sometimes Realtek is disabled by your desktop, especially if it has come pre-downloaded with the service. Open the taskbar to search and enable the application.
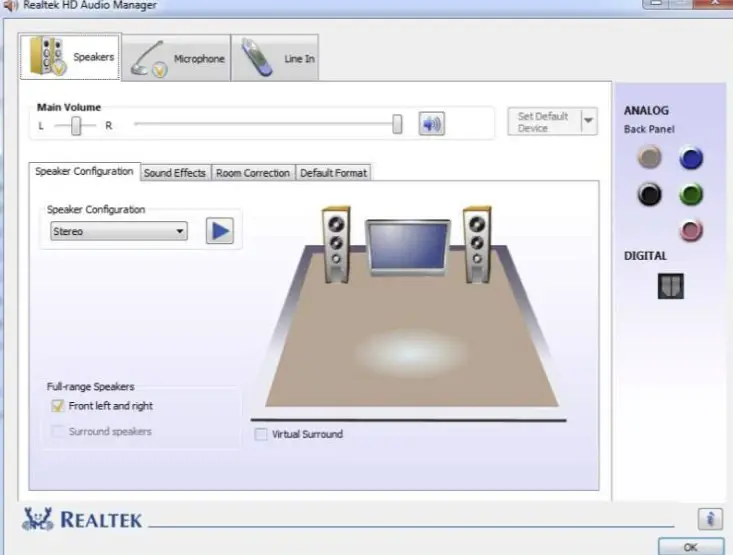
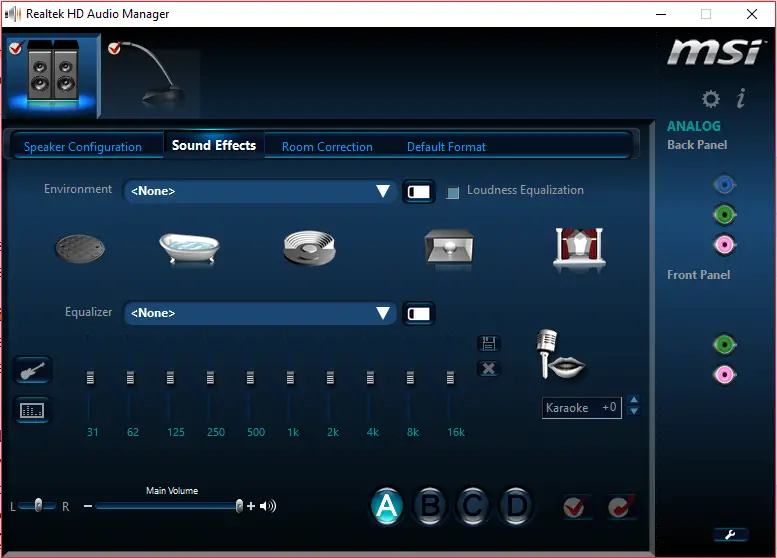
03. Finally, open up the Equalizer by finding it’s icon in the taskbar.
04. To access its equalizer function, simply open the sound effects tab and enjoy your new Windows 10 equalizer.
Equalizer PRO
In contrast, maybe you have a lot more experience with equalizers in general and aren’t completely satisfied with the minimal features of Realtek.
If that is the case, then look no further than Equalizer Pro for all your Windows 10 Equalizing needs.
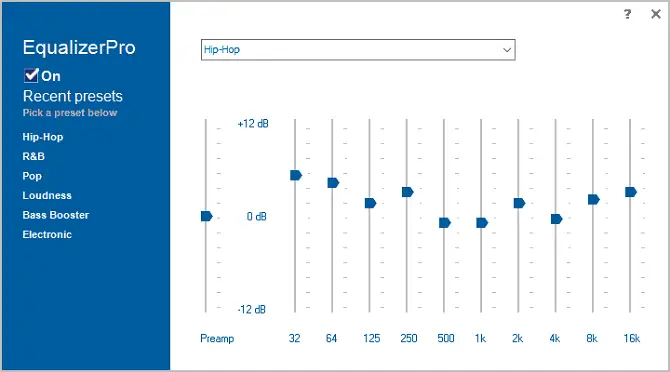
Equalizer Pro is an amazing software filled to the brim with amazing features and options. The Software comes built-in with 20 presets, which is usually enough to satisfy most users.
However, if you still want to tweak your audio further, you have the option of being able to create and save a number of your own presets as well. This makes it so much easier when you have Audio presets specific to each type of media (music, sound, etc).
Instead of having to manually adjust the equalizer dials each time, all you will be required to do is simply load your desired preset and continue with whatever you desire.
Moreover, the software allows for a system-wide bass boost and has an amazing user-friendly interface. Not only providing less clutter but it also makes it easier to use than Realtek by comparison.
Additionally, the streamlined design of Realtek software means that it barely demands any attention from your desktop Processor, making sure not to impede on any of your other running services.
However, the only downside of this Windows 10 Equalizer is the fact that it only comes with a ten-band equalizer, which is somewhat smaller than some of the others we will be recommending in this list.
How to Install:
01. Start by Downloading the official EqualizerPro application from their website.
02. Simply download the Application by running the setup with administration privileges
03. Start the application and you’re done!
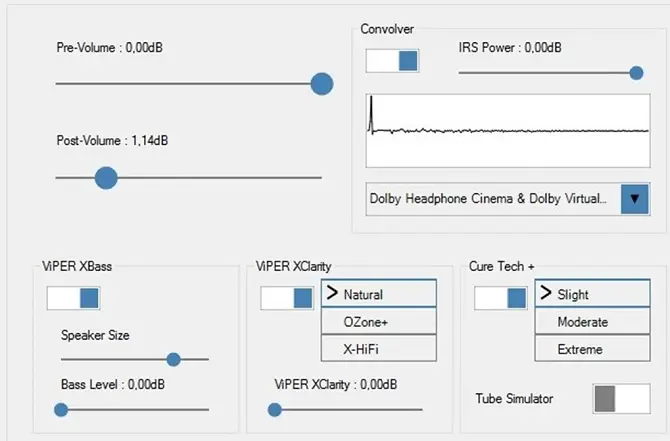
Viper4Windows:
However, if you’d rather not pay, but still get amazing services and a few more options, then why not try giving Viper4Windows a go for your Windows 10 Equalizer? Viper4Windows is open-source software, meaning it’s completely free to use.
Viper4Windows is made by audio enthusiasts for audio enthusiasts. So it’s overfilling with an excess of features. Just right enough for those who want to be a little more involved in the audio they receive.
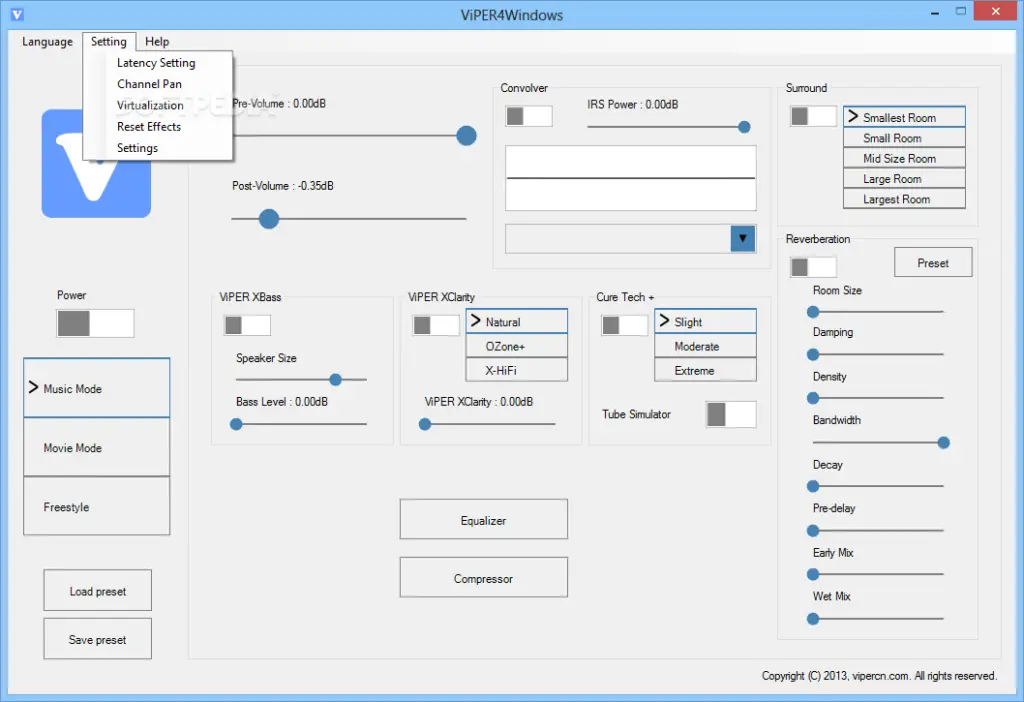
To start with, Viper4Windows has an extraordinary 18 bands, which is impressive considering it is free-to-use open software. The bands themselves range from anywhere between -120dB to 13dB.
Furthermore, just like with EqualizerPro, you also have the option to create your audio profile or load it from a preset.
Additionally, this Windows 10 equalizer service has a bunch of other features that can make your audio experience all that much better.
Including:
Room Size: You can set the size of the room you’re listening in, and Viper4Windows will adjust the surround sound settings accordingly.
Bass Boost: The app offers a customizable extra boost to low-end sounds.
Distortion Control: You can choose from three presets or use the slider to tweak the control in decibels.
Reverberation Settings: Viper4Windows offers settings to control audio damping, density, bandwidth, decay, and more.
The only downside with this particular equalizer for Windows 10 is that it is somewhat of old software. This means it might misbehave or even stop working for your Windows 10 desktop.
This can easily be dealt with, however, with a few simple steps.
How to Install:
01. Start by Downloading the official Viper4Windows Setup found here.
03. Install ViPER4Windows first. Right-click the V4W_Setup.exe, choose ”Run as administrator”.
02. To ensure this product runs on your Windows 10, also download the Windows 10 configuration file found here. Unzip this file.
04. Run the ‘v4w-patcher.bat’ file found from the Unzipped file.
05. Reboot your PC and enjoy your new Window 10 equalizer.
Whether it be for movies, music, video games, or even all of the mentioned. Whatever the reason you may have for wanting an equalizer on your device, we hope this tutorial will have helped you get the best audio you deserve.